Table of Content
Android Bottom Sheets are a popular user interface component used in modern mobile applications. A bottom sheet is a view that slides up from the bottom of the screen to display additional content, actions, or settings.
Bottom sheets provide quick access to important functions and allow users to interact with the app without interrupting their current tasks. In this article, we will explore how to implement an Android Bottom Sheet using Kotlin.
Setup New Project
To begin with, let’s create a new Android Studio project with an empty activity. Give the project name BottomSheetDemo. We will call the activity “MainActivity”. We will also need to add Kotlin support to the project if it’s not already enabled.
How to Create a New Project in Android Studio
To use the Bottom Sheet, which is a material component, in our project, we need to add the Google Material Design dependency. To do so, open the build.gradle (app) file and include the following dependency.
dependencies {
    implementation 'com.google.android.material:material:1.12.0'
}
Create Main Layout
Once the project is created, open the activity_main.xml file and add a button to the layout. We will use this button to trigger the bottom sheet. Paste the following code into your activity_main.xml.
<?xml version="1.0" encoding="utf-8"?>
<androidx.coordinatorlayout.widget.CoordinatorLayout xmlns:android="http://schemas.android.com/apk/res/android"
    xmlns:app="http://schemas.android.com/apk/res-auto"
    xmlns:tools="http://schemas.android.com/tools"
    android:layout_width="match_parent"
    android:layout_height="match_parent"
    tools:context=".MainActivity">

    <com.google.android.material.appbar.AppBarLayout
        android:layout_width="match_parent"
        android:layout_height="wrap_content">

        <com.google.android.material.appbar.MaterialToolbar
            android:layout_width="match_parent"
            android:layout_height="wrap_content"
            app:title="@string/app_name"
            app:titleCentered="true" />

        <com.google.android.material.divider.MaterialDivider
            android:layout_width="match_parent"
            android:layout_height="wrap_content" />
    </com.google.android.material.appbar.AppBarLayout>

    <Button
        android:id="@+id/open_bottom_sheet"
        android:layout_width="wrap_content"
        android:layout_height="wrap_content"
        android:layout_gravity="center"
        android:text="Open Bottom Sheet" />
</androidx.coordinatorlayout.widget.CoordinatorLayout>
Create Bottom Sheet Layout
Now, let’s create a new layout file for our Bottom Sheet. We will call it bottom_sheet.xml. This layout file will contain the content we want to display in the Bottom Sheet. Paste the following code into the newly created bottom_sheet.xml file.
<?xml version="1.0" encoding="utf-8"?>
<androidx.appcompat.widget.LinearLayoutCompat xmlns:android="http://schemas.android.com/apk/res/android"
    android:layout_width="match_parent"
    android:layout_height="wrap_content"
    android:orientation="vertical">

    <com.google.android.material.bottomsheet.BottomSheetDragHandleView
        android:layout_width="match_parent"
        android:layout_height="wrap_content" />

    <TextView
        android:layout_width="match_parent"
        android:layout_height="wrap_content"
        android:layout_marginHorizontal="24dp"
        android:gravity="center"
        android:text="This is your Bottom Sheet."
        android:textAppearance="?attr/textAppearanceTitleLarge" />

    <TextView
        android:layout_width="match_parent"
        android:layout_height="wrap_content"
        android:layout_marginHorizontal="24dp"
        android:layout_marginVertical="4dp"
        android:gravity="center"
        android:text="Click on Close button to dismiss the Bottom Sheet."
        android:textAppearance="?attr/textAppearanceBodyLarge" />

    <Button
        android:id="@+id/close_btn"
        android:layout_width="wrap_content"
        android:layout_height="wrap_content"
        android:layout_gravity="center"
        android:layout_margin="24dp"
        android:text="Close" />
</androidx.appcompat.widget.LinearLayoutCompat>
In the above Android BottomSheet layout, we added BottomSheetDragHandleView, two text views, and one Close button. The view helps you to drag the bottom sheet up and down.
Display Android Bottom Sheet
Now that we have our Bottom Sheet layout, let’s implement it in our MainActivity. In the MainActivity, we will get a reference to the button we added in the layout and set a click listener on it. When the button is clicked, we will inflate our Bottom Sheet layout and display it. Paste the following code into the MainActivity.kt file.
package com.example.bottomsheetdemo

import androidx.appcompat.app.AppCompatActivity
import android.os.Bundle
import android.view.View
import android.widget.Button
import com.example.bottomsheetdemo.databinding.ActivityMainBinding
import com.example.bottomsheetdemo.databinding.BottomSheetBinding
import com.google.android.material.bottomsheet.BottomSheetDialog

class MainActivity : AppCompatActivity() {
    private lateinit var binding: ActivityMainBinding
    private lateinit var bottomSheetDialog: BottomSheetDialog
    private lateinit var bottomSheet: BottomSheetBinding
    override fun onCreate(savedInstanceState: Bundle?) {
        super.onCreate(savedInstanceState)
        binding = ActivityMainBinding.inflate(layoutInflater)
        setContentView(binding.root)

        bottomSheetDialog = BottomSheetDialog(this)
        bottomSheet = BottomSheetBinding.inflate(layoutInflater)
        bottomSheetDialog.setContentView(bottomSheet.root)

        binding.openBottomSheet.setOnClickListener {
            bottomSheetDialog.show()
        }

        bottomSheet.closeBtn.setOnClickListener {
            bottomSheetDialog.dismiss()
        }
    }
}
In the code above, we first get a reference to the button we added in the layout and set a click listener on it. Inside the click listener, we inflate our Bottom Sheet layout using the LayoutInflater.
Next, we create a new instance of the BottomSheetDialog class and set our inflated layout as its content view using the setContentView() method.
Finally, we get a reference to the close button inside our Bottom Sheet layout and set a click listener on it. When the close button is clicked, we dismiss the Bottom Sheet using the dismiss() method of the BottomSheetDialog class.
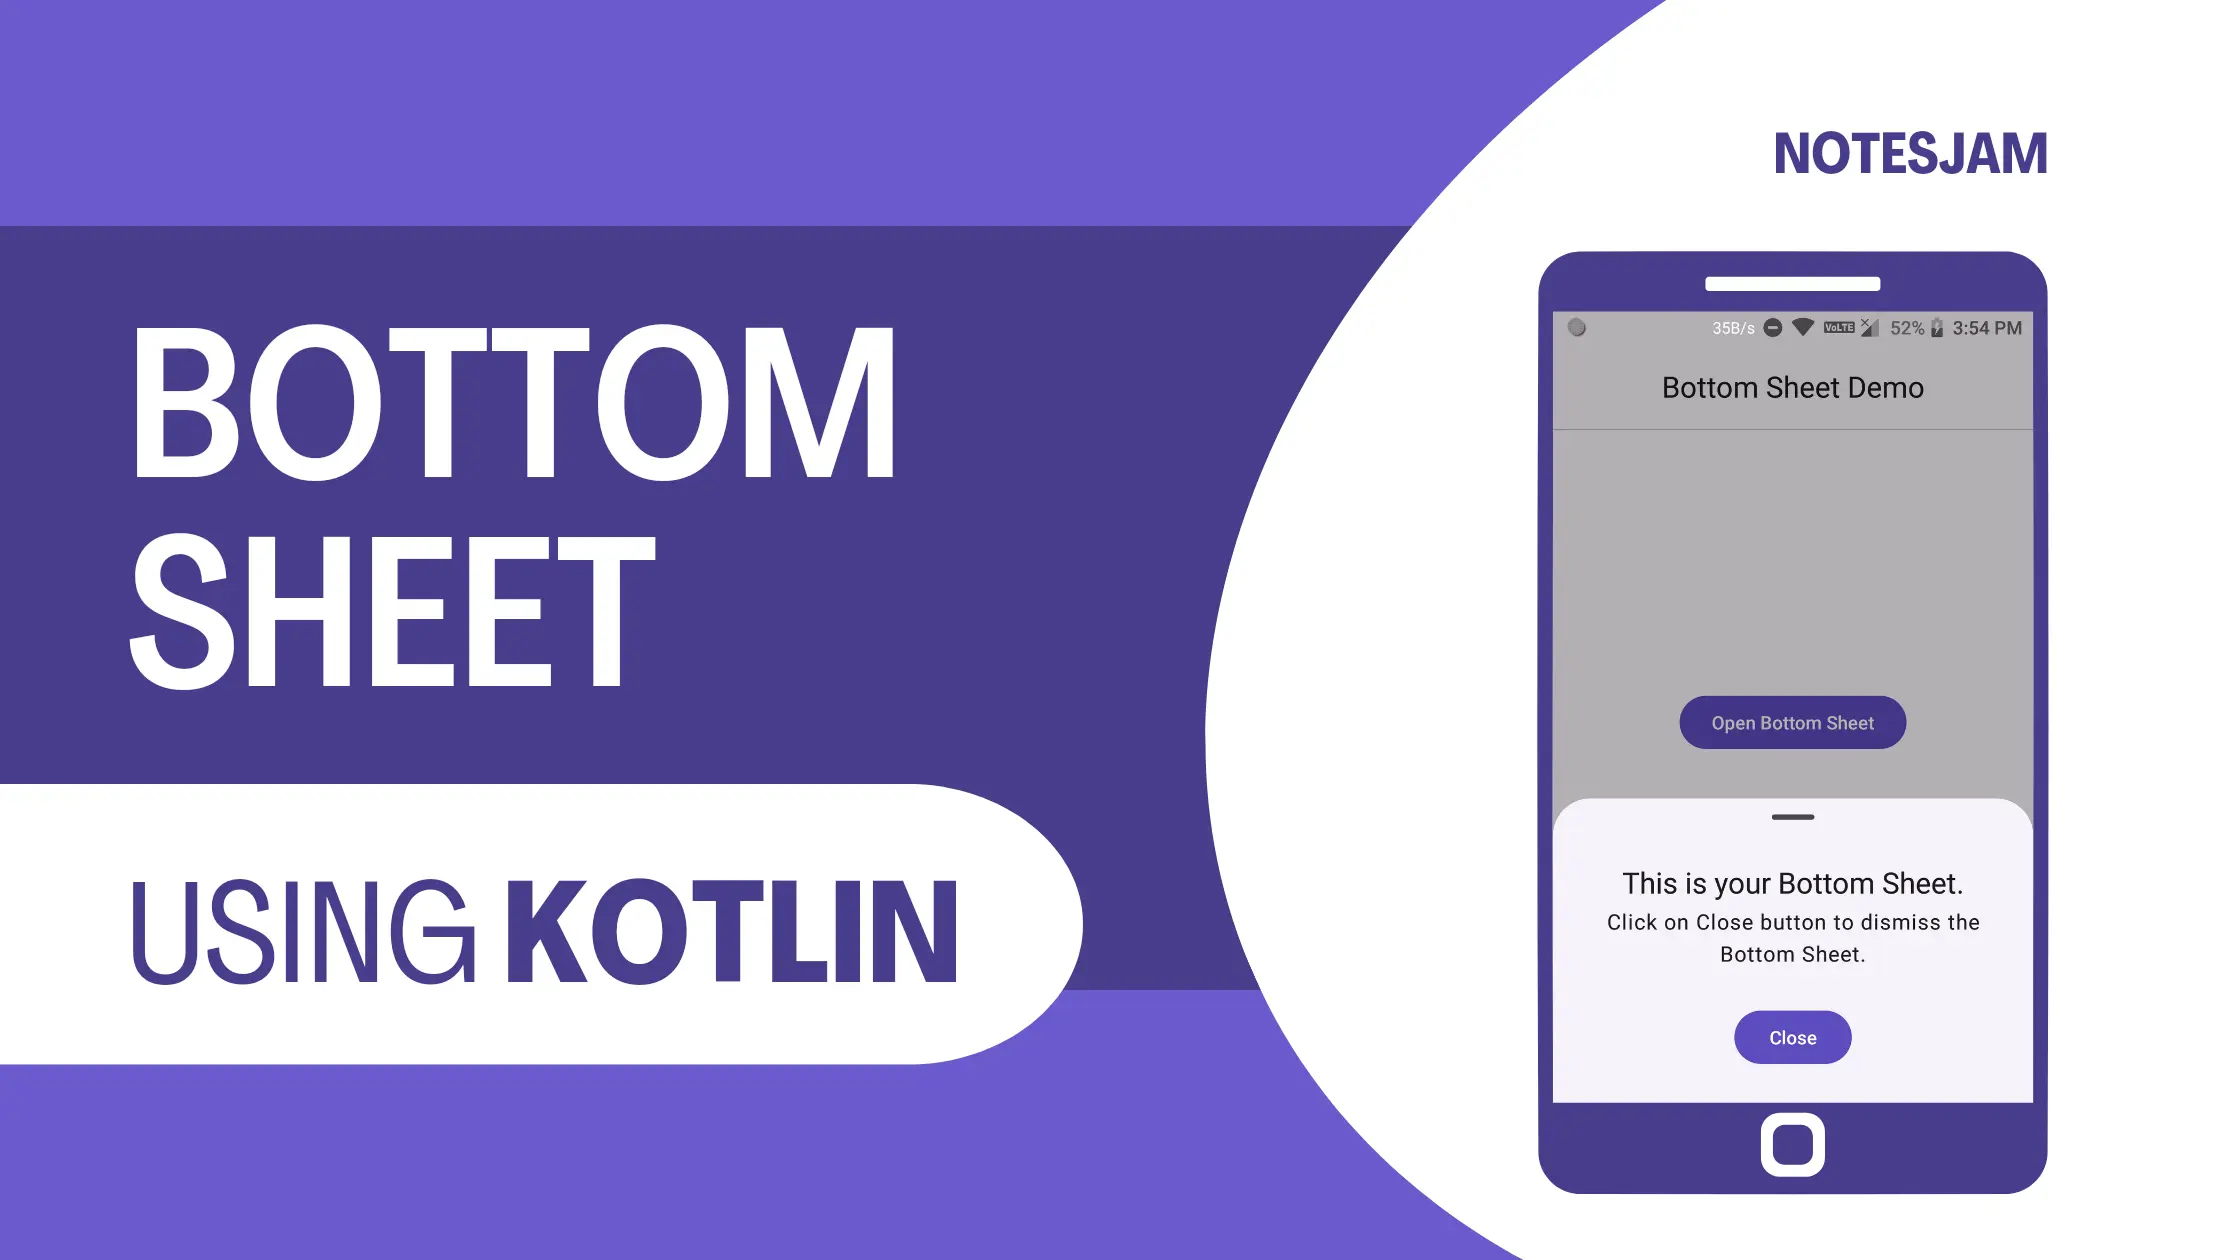
And that’s it! We have successfully implemented an Android Bottom Sheet using Kotlin. Run the app and click on the “Open Bottom Sheet” button to see the Bottom Sheet in action.
Testing Your App
Run your app on an Android Virtual Device or a physical device. Click on the Open Bottom Sheet button to ensure it triggers the desired action. Here is the final output.

In conclusion, Bottom Sheets are a great way to provide users with quick access to important features and information without disrupting their workflow. Kotlin makes it easy to implement Bottom Sheets in your Android apps.
By following the steps outlined in this article, you can add this popular UI component to your app and enhance the user experience.
So, go ahead and try it out today!